Showing posts with label free. Show all posts

Thursday, August 13, 2015

Rainbows and Adult Beverages

Summer: it's all about rainbows and beer, amiright? Here in sticky, swampy New Orleans, I admit I haven't been keeping up with my backlog of projects as well I do in the cool(er) months, but summer is the perfect time for those quick, stash-busting projects that can keep your fingers busy without heating you up. No afghans, please.

This project is fun for a lot of reasons. It has rainbows, it has googly eyes, it begs you to crack open a cold one, and best of all you can use it right away no matter what the weather is outside because you won't be wearing ityour beverage will!


Behold the rare and elusive Rainbeer
.


I made this for a good friend's birthday and it looks like the celebration it is. A birthday celebration and a celebration of marriage equality, not to mention a celebration of the brief cool respite that follows summer rainstorms.

You may notice this koozie is more expressive than most.  The eyes are by no means necessary. I mean, a traditional rainbow is still pretty fun. But I have to say I was surprised by how much they add to the piece. Even without any other facial feature, this koozie has some serious personality. 

Rainbeer

Materials
  • Worsted weight yarn in the colors of the Rainbow, plus black and white for eyes if desired. Shown in Red Heart Super Saver in Ranch Red, Carrot, Gold, Hunter Green, Royal, Dark Orchid, Black, and White.
  • US H (5 mm) hook, or size needed to obtain gauge
  • Tapestry or Large eye blunt
  • Sewing pins

 Notes
  • Turning chains do not count as the first stitch of rows.
  • Repeat directions following * to end of round.

Abbreviations
ch: chain
sc: single crochet
hdc: half-double crochet
sl: slipstitch
inc: increase (crochet two stitches in one space)
BLO: back loop only

Gauge
14 sts and 11 rows = 4 inches in hdc

Instructions

With Dark Orchid, make a magic ring.

1:  Ch 1, hdc 8. Sl to join this and all succeeding rounds. Do not turn.  (8)
2:  Ch 1, *hdc inc.  (16)
3:  Ch 1, *hdc, hdc inc.  (24)
4:  Ch 1, *hdc 5, hdc inc.  (28)
5-6:  Ch 1, *hdc.
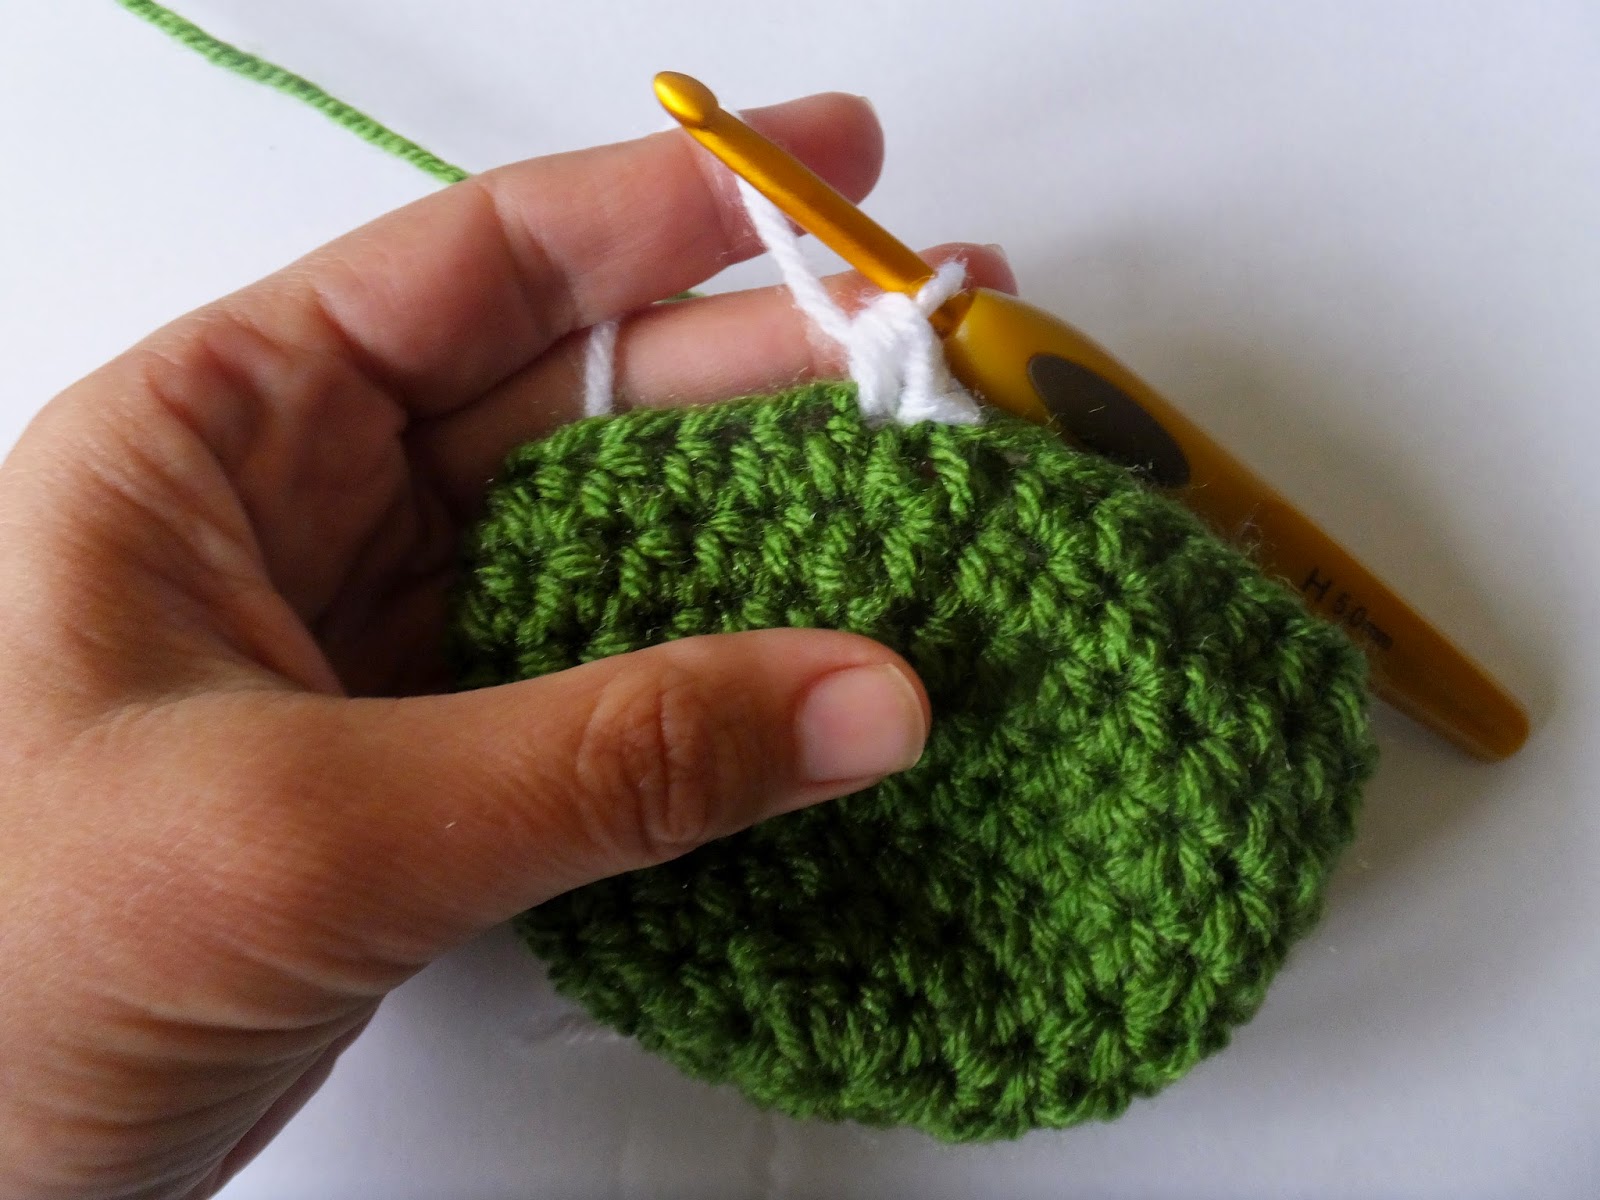
7:  With Royal, join round in back loop only (BLO). Ch 1, *hdc in BLO.
8:  Ch 1, *hdc.
9:  With Hunter Green, join round in BLO. Ch 1, *hdc in BLO.
10:  Ch 1, *hdc.
11:  With Gold, join round in BLO. Ch 1, *hdc in BLO.
12:  Ch 1, *hdc.
13:  With Carrot, join round in BLO. Ch 1, *hdc in BLO.
14:  Ch 1, *hdc.
15:  With Ranch Red, join round in BLO. Ch 1, *hdc in BLO.
16:  Ch 1, *hdc.
17:  Join in BLO. *Sl loosely in BLO. Join round. Tie off. Weave in all ends. 

Your koozie should now look like this:


 Stop here, or give your koozie some personality and add the googly eyes!

Eyes (optional)
Make 2

Pupil
With black, make a magic ring.
Ch 1, sc 4. Sl to join. Tie off leaving long tail to sew edge down to eye white.
White
With white, make a magic ring.
Ch 1, hdc 8. Sl to join. Tie off, leaving long tail to sew eye to koozie.
  
Finishing
Position pupil on white however looks best to you and pin in place. This is totally personal preference. You can have the pupils centered at the bottom of the white if you like the way mine looks, but you can also have your Rainbeer looking up, looking to the side, cross-eyed, or with both eyes in different directions. Give it some personality! Using a large eye blunt needle, stitch around edge of pupil. Weave in ends.

Next, position the finished eyes on the koozie and pin in place. I thought mine looked best with the bottom of the eyes lined up with the bottom of the gold band, but again, totally up to you! Have fun with it. Using a large eye blunt needle, stitch around edge of white. Weave in ends.

You’re done!  Give your Rainbeer a drink!

 My Rainbeer has a Sierra Nevado Torpedo. I think he likes it.

This design is available as a pdf download from my Ravelry shop: Strung Out Fiber Arts Designs


Sunday, June 14, 2015

Quick Projects for Father's Day

If you're anything like me, about a week out is when you start really thinking (panicking?) about getting together a handmade gift.

Thankfully, there are lots and lots of free or inexpensive patterns you can whip up quickly and easily and that will be sure to make your dad proud.

Moogly has several lists of free patterns for Dad-day you can find on the blog. I'm partial to this one from last year: Father's Day Crochet 2014. That snazzy vest! The too-darn-cute instagram-inspired phone cover! TWO kinds of neck tie! And other than the vest and the throw, they should all work up fairly quickly.


Free #Crochet Patterns for Father's Day! Get links to them all at Mooglyblog.com


If your dad's a golfing kinda guy, take a look at this year's list, which includes 3 different patterns for golfers: Father's Day Crochet 2015


Free Crochet Patterns for Father's Day, 10 Ideas, 15 Free Patterns, beer, apron, dopp, tie, hat, golf, socks, remote control, running dads, moogly


Lion Brand offers a classic looking set of Golf Club Covers. I like how the simple color changes make them look different, but they're clearly still a matching set. And those numbers are both nice looking and useful!

Image of Golf Club Covers


If your dad is a bit too goofy for that, try this Tee Bag pattern by Priscilla Hewitt. It's adorable, unique, and comes with its own pun!

Free Crochet Pattern Father's Day Golf Tee Organizer Bag


 And for the Caddyshack fanatic, Red Heart has a pattern for Gopher Golf Club Covers. Too funny!
   
Gopher Golf Club Cover

For the tech lover, try this simple, Stash Buster Tablet Case from Habitual Homebody. While great as a stash buster, you could also alter the colors to match your dad's favorite sports team. I'm sure the sizing would be fairly simple to adjust as well.

Stash buster crochet tablet case


For a super duper easy gift, try the Absolutely Easy Glasses Case by Rachel Choi. Choosing a variegated yarn will give this simple pattern some interest, but it would look good in any color, and it's one of the more practical gifts you could give.

crochet glasses case

 Aaand, for the shameless self-promotion portion of this episode, my very own Power Tie Coffee Cozy pattern can be found in the May issue of Happily Hooked Magazine. (There are many other patterns in there too, of course.)


I may be biased, but I think it's pretty cute. You can try the magazine out for just 99 cents, but subscribers do get some special perks like a free coupons for patterns by designers included in the issue, including my very own Mod Bob.  


That one might not be suitable for dad...unless you're dad is SUPER fun. Then go for it!


Wednesday, May 27, 2015

The Victory of the Dark Side

Have you ever looked at a lovely colorwork pattern and thought, I like that, but...nahhh? Sometimes colorwork just isn't what you want to do, or won't create the effect you're looking for, or you simply have a stash of one color you want to do something with, and stripes aren't in the cards.

I experienced a combination of these feelings when I came across the pattern for the Victory Jumper, found via the V&A Knitting Pattern Archive.


free 1940's Knitting pattern Your Victory Jumper
and check out that vintage telephone!

The Victory Jumper, one of many vintage knitting patterns I've admired and one that promises, right there in the photo, "Such an Easy Pattern." Who could resist? I love the shape, the long waist and lacy blouse, and the long slim sleeves. It's flattering and fun. 

So, I knitted it.

In black.

First, I swatched like the good little knitter I (usually) am. The lace pattern looks quite differentand simplerfrom a distance, but the single color also highlights the eyelets in the lace in a way the stripes don't. I decided to knit it with a somewhat slimmer shape to amplify that effect.

My gauge was a bit larger than the pattern required, so I adjusted the stitch count as well. The larger gauge also made those eyelets really pop.


Ta-daa!


It's fascinating (to me at least) how much adding or eliminating color changes can affect a garment's overall look. The scallops made so obvious by the color changes in the original design are virtually eliminated. If you look closely you can see the stitches sloping up and down, but the overall effect is if a vertical-striped lace.


I'm happy with the experiment and the result. The single dark color makes the top look less casual, more suited to a night out on the town than chatting with your girlfriends on your rotary phone...or whatever kids do these days.

classy and sassy

The dark side is victorious! And in this case, I don't mind a bit. Knit this sweater and you will probably be compelled to put your hands on your hips and strike a pose. There's really no way not to.


And one last pic where you can actually kinda see my earrings, just because this is literally the most I've ever matched in my lifeskirt, top, earrings, and lips. It's madness!

Happy Knitting!


Thursday, May 14, 2015

Crafty Disney

The most popular items in the Etsy shop for Strung Out Fiber Arts are always my Disney princess wigs. Whether it's finished items, like my Princess Ariel wig for babies (a perfect photo prop I might add), or patterns like my Cinderella wigs for both babies and adults, if it makes you feel like a princess, it's going to be a hit!

Now Attraction Tickets Direct has been kind enough to gather a fun group of  disney crafts and activities into a handy article: Crafty Disney!

Of course, I can't help but be a fan with my picture right there in the cover image. *blush*

Get the pattern here: Snow White Wig


But there are plenty of fun things from other crafty types as well. I was especially taken with this free tutorial on Princess Aprons on the Gluesticks blog. The apron idea is really ingeniouseasy to put on and take off, and includes an adjustable waistband so the fun can last for years, even when your princess is growing like a weed.

Frozen Girlie Photos


A single base pattern can be altered to make 8 different princesses. Pretty clever, if you ask me.

Princess Aprons 8 in 1 Tutorial

Now that you're all dressed up with a wig and a fancy apron, sit back and relax with a Disney themed cocktail! Assuming you're of age, of course.

Cocktails by Cody has a Tumblr found here: http://cocktailsbycody.tumblr.com/ but at the time of this blog publication it seems to be having some tech issues with the photos. You can still find all kinds of goodies on his Facebook page, though. Like this Peter Pan themed cocktail, Lost Boy, for those who'd prefer not to grow up. And that's all of us, isn't it?


And there are plenty more where that came from. Don't forget to check out the full article on Crafty Disney for even more fun ideas!


Tuesday, March 10, 2015

Irish Flag Koozie

As promised, a brand new pattern using the shamrock embellishment I wrote about recently. A drink koozie that declares your Irish heritage—whether you celebrate it all year round or just vicariously on St. Paddy’s Day. The stripes mimic the colors of the Irish flag, and of course there is the necessary shamrock for good luck. Best of all, it's FREE!!!

The pattern is also available as a pdf download from my Ravelry Store and as a finished item in my Etsy shop: Irish flag koozie

Onto the pattern.


Irish Flag Koozie

Materials
  • Worsted weight yarn of your choice in green, white, and orange. Lighter green worsted yarn for shamrock. Koozie pictured is made with Lion Brand Vanna’s Choice in Kelly Green, White, and Terra Cotta. Shamrock is made with Caron Simply Soft in Limelight
  • US H (5 mm) hook, or size needed to obtain gauge
  • Tapestry or Large eye blunt needle
  • Sewing pins    

Notes
  • Turning chains do not count as the first stitch of rows.
  • Repeat directions following * to end of round.

Abbreviations
st : stitch
ch: chain
hdc: half-double crochet
tc: treble crochet
sl: slipstitch
inc: increase (crochet two stitches in one space)

Gauge
14 sts and 11 rows = 4 inches in hdc

Koozie

1:  With Kelly Green, hdc 8 in a magic ring. Sl to join this and all succeeding rounds. Do not turn.  (8)
2:  Ch 1, *hdc inc.  (16)
3:  Ch 1, *hdc, hdc inc.  (24)
4:  Ch 1, *hdc 5, hdc inc.  (28)
5-8:  Ch 1, *hdc.
9-12: With White, Ch 1, *hdc.
13-15: With Terra Cotta, Ch 1, *hdc.
16: Ch 1, *sc. Tie off. Weave in ends.


Note:  When changing colors, switch yarns in the last yarn over of the last dc of the previous round. This makes for the most seamless transition.

In the last yarn over of the last green stitch, pull up a loop of white.

Sl to join, and continue with white.


Shamrock
With Limelight, working into a magic ring, Ch 3, tc, hdc, tc, ch 3, sl back into ring. Repeat 2 more times. Pull ring tight. For stem, ch 5, sl in second ch from hook and remaining chains. Tie off, leaving long tail (+/- 15”) to sew to koozie.


Finishing
Pin the shamrock into place in the desired position. I center mine opposite of the seam in the white section, with just the edges coming out into the other colors. Stitch around the edge of the shamrock, catching the yarn just under the shamrock edge. Tie off and weave in ends.


You're done! Time to celebrate!