Friday, January 22, 2016

Free Valentine's Pattern, Chocolate Candy Earrings


National Chocolate Day (aka Valentine's Day) is right around the corner. I'm not much of a hearts-and-flowers kind of gal, but who can argue with a nice big chocolate truffle? Certainly not me. I do crochet plenty of cute things, but generally stop short of cutesy, and I think this pattern fits into my style with a Valentine's twist. Chocolate Candy Earrings!


I made these in two sizes and a variety of colors to show off the possibilities, though I'm sure infinite varieties could be made if you chose. This is a simple, quick, and easy pattern you can whip up in a flash for a fun gift for your valentine (or for yourself!).  

Large size, in pink and black

Small size, in brown and light pink

Directions for both sizes are given below. The small size measures about 1" in diameter while the large measures about 1 1/4." Because they're made of just a bit of yarn and polyester fiberfill, even the larger earrings are very light and comfortable to wear.

Valentines Chocolate Candy Earrings


Materials
  • A small amount of worsted weight yarn in the color of your choice for candy. Shown in Caron Simply soft in Chocolate and Soft Pink
  • Embroidery Floss in the color of your choice for decorative swirl
  • US G (4 mm) hook
  • Tapestry needle
  • Polyester fiberfill stuffing
  • Two flat post earring back
  • Felt (Optional)
  • Hot glue 
Notes
  • Worked in a spiral; do not join rounds unless otherwise noted. Do not turn at ends of rounds.
  •  Repeat directions following * to end of round, unless otherwise noted.
  • You may find it easier to do the embroidery before completing the candy pieces as the opening is quite small when finished. After round 4 for the small size, or 5 for the large size, drop the yarn to do the embroidery and then pick it back up to finish.
Abbreviations
ch: chain
sc: single crochet
hdc: half-double crochet
sl: slipstitch
inc: increase (crochet two stitches in one space)
dec: decrease (crochet two stitches together)
BLO: back loops only
Gauge
Gauge is not crucial for this project 
Instructions
Small Size
Make a magic ring.
1:  Sc 6 into magic ring. Mark end of this and following rounds. Do not join.
2:  *Sc inc, sc.  (9)
3:  *Sc inc, sc 2.  (12)
4:  *Sc.
5:  Sl to join with first st. BLO: ch 1, *sc dec. Sl to join with first st.  (6)
Tie off, leaving a long tail to close up bottom.
Large Size
Make a magic ring.
1:  Sc 6 into magic ring. Mark end of this and following rounds. Do not join.
2:  *Sc inc.  (12)
3:  *Sc inc, sc 2.  (16)
4-5:  *Sc.
6:  Sl to join with first st. BLO: ch 1, *hdc dec. Sl to join with first st.  (8)
Tie off, leaving a long tail to close up bottom.
Swirl
Cut a length of embroidery floss at least 4 feet long. With a double thickness of floss, backstitch around the spiral of stitches, starting close to the center. Insert the needle from the wrong side and make a small stitch (about 1 sc). Moving around the spiral, pull up needle in the next space and stitch back two, so the stitches form a continuous line. Be sure to insert the needle in front of the thread from the previous stitch for the smoothest line.
 
Finishing
Stuff candy with a small amount of polyester fiberfill. With a tapestry needle, weave yarn tail through remaining stitches and pull tight to close. Weave in end.

Hot glue the earring backing in place, either in the center or toward the top (recommended for the large size candies). If desired, cut a circle of felt slightly larger than your flat post earring back. Press the post through the center of the felt and glue in place. I find this attaches the post more securely than only gluing it to the yarn.


You're ready to wear your love of candy on your sleeve. Or, rather, your ears. Happy Chocolate Day!


Friday, January 8, 2016

Pattern Review: The Sandra Sweater

Once in a while, when I knit something that will take more time and commitment than a hat or some fingerless gloves, I actually follow a pattern! I know, it's wild.

Awhile back, I picked up a bundle of back issues of Knitscene from Interweave, and it's become my favorite knitting magazine. Lots of great ideas and patterns that actually look good on the people wearing them, which seems like no small feat when you check out some of the other knitting mags out there.

The Australian Women's Weekly, 1967.:
Ok, that one's from 1967, but you get my point.

One of my most recent pattern-following successes was The Sandra Sweater by Odessa Reichel. It's from the Fall 2012 issue and has the kind of retro styling I'm drawn to, and that will continue to be fashionable for years to come. 


Knitscene-fall-2012-0969_small2
The original
Cute as it is, when I use someone else's pattern, I rarely stick to it completely, and this sweater was no different. I used a stash yarn I picked up on ebay I don't even know when (a Merino wool blend from ICE yarns). and had a gauge that was....close enough.

The yarn
I got 20sts for 4 inches rather than 21. Based on my measurements, I could go with the size 34 1/2 for a snug fit or 36 1/2 for a looser fit.

I did some math....
Trust me, it's worth it. And actually kinda fun.

Pattern gauge
21 sts / 4" = 5.25 stitches per inch

My gauge
20 sts / 4" = 5 stitches per inch

That doesn't sound like much of a difference, but it can really affect your sizing when spread over a whole garment. You can figure out how much with just a little more math. 

Pattern measurement for Back
I calculated this by dividing the number of stitches by the gauge per inch.

Size 34 1/2
90 sts / 5.25 = 17.25"

Size 36 1/2
96 sts / 5.25 = 18.28"

Size 34 1/2 using my gauge
90 / 5 = 18

Following the size 34 1/2 pattern with my adjusted gauge would get me a size 36. That sounded just right to me, so I followed the directions for that size. Since my gauge was close to the original, the adjustment is relatively minor, and I can just size down from what I might have chosen with the correct gauge. If your gauge is way off, it can be rather trickier, as you may have to make up a new size based on your gauge.

Math homework completed, I was off to knit!

I didn't have another color of the yarn in question, and didn't particularly care for the thin stripes in the design anyway, so I omitted those.

The wip
The mock cable design on the front worked up easily and more quickly than a traditional cable knit. I also found it much less bulky, which worked well for the relatively fine yarn and made a nice, thin sweater perfect for the cooler days in my very un-chilly climate (New Orleans).

The finished product

Overall, I'm quite happy with the result. If I were to knit it again, I might add a little extra length, as the cropped cut limits the sweater's usefulness (at least in my wardrobe). My one complaint was the total lack of directions in how to seam the puff sleeves. I would have been much happier (and would have put off seaming a much shorter time) if there was some indication of how to best ease in that extra material. Google failed me on finding a tutorial, and I was left to my own trial-and-error devices. I ended up doing a couple folds at the top and sewing the sleeves in through a double layer of fabric at strategic points. I'm not, however, convinced this was the best way to go about it. C'est la vie. I do think they turned out all right anyway.

Happy knitting!


Friday, January 1, 2016

New Year's Resolutions

Image result for new year's resolution
Do you make New Year's resolutions? Have you ever made a yarn-related one? For many years I either didn't make them at all, or made half-hearted ones. I made resolutions I hoped would help me get into a particular habit or get closer to a particular goal, but they never worked all that well. And they didn't work for the most classic reason: I couldn't stick with them. They ended up feeling like too much, I'd miss a day or blow a self-imposed deadline and feel I hadn't kept the resolution already so missing more days was no longer meaningful.

The 3 Steps to Completing your 2016 New Year's Resolution
http://theodysseyonline.com/baldwin-wallace/steps-completing-2016-years-resolution/261136

For 2015, I changed the pattern. I made a single, very specific resolution, and I kept it! I resolved to publish 12 crochet patterns before the end of the year. That's one a month, of course, and my plan was to complete one every month. It didn't quite work out that way, but even though some months I published nothing and some months I published two patterns or more, the work got done. I reached my goal. There are two specific reasons I think my resolution worked for me this year in a way resolutions haven't worked for me in the past.

1. It's quantifiable. I didn't resolve to write "more" patterns; I resolved to write 12. Having a real count made the goal concrete and achievable in a way that "more" could never be. Once I'd gotten a couple done, there were only 10 left. A couple more, and it was only 8. There's an inherent reward in working toward a concrete goal like this one—it gets closer with every step.

2. It's personally achievable. What I mean by that is the resolution was attainable through my own actions only. Your goal might be to get published in a national magazine, but that isn't a very good resolution because ultimately it's not up to you. It's up to the magazine editors. Instead, you might resolve to submit something to a magazine twice a month. That way the resolution is something you can achieve all by yourself. I used the word "publish" in my resolution because I planned to be mainly self-publishing here on the blog and selling patterns myself on Ravelry and Etsy. I did have a few patterns come out in magazines, and of course I counted those, but I made sure not to rely on others to achieve my goal.

With this in mind, I think I'm going to repeat my resolution. I know I can do 12 more patterns this year. And I'd like to add to it by making a resolution about this oft-neglected blog I've started. I think I can do 50 blog posts in 2016. I'm not positive I'll make one a week, though I think that's a good goal and will help keep me on track, and I've got a couple "vacation" weeks planned into the number for when it just isn't going to happen. I know I can do it! (And hey, I'm already down to 49.)

To wrap up my year, here they are in order of appearance, the patterns I published in 2015!

1. The Mod Bob


2. Zebra Chevron Legwarmers  FREE!


3. Candy Hearts  FREE!


4. Lucky Clover Headband  FREE!


5. Irish Flag Koozie  FREE!


6. Power Tie Coffee Cozy in Happily Hooked Magazine #14


7. Uterus Bean Bag 


8. A Twist of Lime Summer Cap in Happily Hooked Magazine #17


9.  Rainbeer  FREE!


10. Candy Cane Coffee Cozy  FREE!


11. Christmas Light Ornament  FREE!


12. Puffed Wheat Winter Hat (forthcoming, in Happily Hooked #23!)


Happy New Year and Happy Crocheting!

Wednesday, December 23, 2015

Christmas Light Ornament


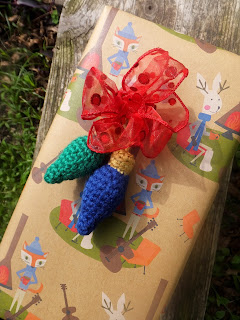
This is very likely my last blog post of year, so I'd like to go out with a bang, by which I mean a free pattern! It's a Christmas pattern, so yeah, very last minute, but it's so quick and easy you could whip one up on a short car ride to wherever you're spending your holiday. Almost any worsted weight yarn would work great and you need just a few yards to make your own Christmas Light Ornament. 

Christmas Light Ornament

Materials
  • Worsted weight yarn in at least two colors, Color A for the light portion and Color B for the top. My lights are made with Red Heart Super Saver in Ranch Red and Royal Blue, Red Heart Fiesta in Harvest, and Caron Simply Savor in Kelly Green. The tops are made with Caron Simply Soft in Autumn Maize.
  •  US G (4 mm) hook
  • Tapestry or Large eye blunt needle


Notes
  • Worked in a spiral; do not join rounds unless otherwise noted. Do not turn at ends of rounds.
  • Repeat directions following * to end of round.
Abbreviations
sc: single crochet
sl: slipstitch
inc: increase (crochet two stitches in one space)
BLO: back loops only

Gauge
Not crucial for this project

Instructions


With Color A, work 4 sc in magic ring
1: *sc inc, sc (6)
2: *sc (6)
3: *sc inc, sc (9)
4: *sc inc, sc 2 (12)
5: *sc
6: *sc inc, sc 2 (16)
7-8: *sc
9: *sc dec, sc 2 (12)
10: *sc dec, sc.  (8)
Sl to join. Tie off.
Stuff with poly fiberfill close to the top of the piece.
11: Join Color B in the back loop of any stitch of the last round. In BLO, *sc.
12-13: Sl to join in back loop of first st. In BLO, *sc.
Tie off, leaving a long tail to make a hanging loop for your ornament (6-8” should be enough).


Finishing
Pack stuffing up to the top of the ornament. Using a tapestry needle or large eye blunt needle, weave your yarn tail through the back loops of remaining stitches and pull tight to close. Weave back and forth a couple times to secure the yarn, ending in the center of the top of the light. Insert needle under a strand of yarn near where you’ve pulled up your yarn tail, pull it up until the loop looks about the right length for your ornament, and…tie a knot in it! I know, the horror. But don’t worry, just weave the yarn back under a few stitches to pull the knot underneath and out of sight and trim the tail, tucking the last bit of  yarn inside the ornament. 


I especially like little holiday projects like this as personal additions to gifts or cards, and they look nice on top of a prettily wrapped package. Adding a little something homemade makes a gift that much more special, even when you only had time for a mini-project like this one.


Or you can go ahead and hang it right on your tree! 


Happy Holidays!


Wednesday, December 16, 2015

Candy Cane Coffee Cozy

If you're anything like me, the holidays always somehow come sooner than you expect, and you don't consider a gift "last minute" unless you're weaving in the ends in the car on the way to Grandma's. If you're like me and you're in the market for a quick stash-busting stocking stuffer, I have the free pattern for you!


 My Candy Cane Coffee Cozy uses just half an ounce of yarn total and works up super quick. It's a very simple pattern with just one unusual technique, a technique I'd say is actually easier than the usual method. If you've done crochet colorwork before, you likely know that color changes are smoother when done in the last yarnover of the stitch before the color change.

However, since this pattern is designed to spiral like the stripes on a candy cane, the color changes work best when made BETWEEN the stitches instead. For this method, you'd work a complete hdc with color A, then change to color B for the first yarnover of the next stitch. The result will look like this:


See how the last red stitch top appears over a white stitch, and the last white stitch top appears over a red stitch? This method works for this pattern because of the color changes shift one stitch to the left on each round. After round one, you'll work red stitches only into stitches with red tops and white stitches into stitches with white tops. Pretty nifty, eh?

For the last round of hdcs (Round 8), color changes are worked in the traditional method. In the last stitch before a color change, you'll use color A to yo, insert your hook into the stitch, yo and pull up a loop, then color B to yo the last time and pull through all the loops on the hook. The result looks like this:


Red tops on red stitches and white tops on white ones. This method is used for the final round of hdcs to give the piece a more finished look.

I wrote this pattern up in both a simple version and a detailed version. I find the simple version easier to follow, but if you'd rather see exactly how many stitches of each color and in what order they're worked, check out the detailed version. Both are free and both are below. A downloadable pdf is also available in my Ravelry Store. Enjoy!

Candy Cane
Coffee Cozy


Materials

  • Worsted weight yarn in red and white. Shown in Red Heart Super Saver in Ranch Red and White.
  • US H (5 mm) hook, or size needed to obtain gauge
  • Tapestry or Large eye blunt needle

Notes

  • Worked in a spiral; do not join rounds unless otherwise noted. Do not turn at ends of rounds.
  • Repeat directions following * to end of round, unless otherwise noted.
  •  Change colors between stitches rather than in the last yarn over of previous stitch, except in last round of hdcs. See this blog post for explanation:
  • Color designations are given before the stitches they apply to. “White hdc 2” means to work the next two hdc in white.

 Abbreviations

ch: chain
sc: single crochet
hdc: half-double crochet
sl: slipstitch
inc: increase (crochet two stitches in one space)

Gauge
8 sts and 5.5 rows = 2 inches in hdc 

Simplified Instructions 

With white yarn, ch 31.
1:  Working into the bump on the back of each ch, join in a ring, ch 1 (does not count as first st), sc in same sp. Change to red. (Be sure to change colors between stitches.) *With red hdc 2, with white hdc 2.  Mark the end of this and each succeeding round. Do not join rounds. (31)
2-3:  *Hdc, working white stitches into white stitch tops and red stitches into red st tops.  (31)
4:  *Red hdc inc, hdc 1, white hdc 2, red hdc 2, white hdc 2. Last repeat will end with only 1 white hdc instead of 2.  (35)
5:  *Hdc, working white stitches into white stitch tops and red stitches into red st tops.  (35)
6:  White hdc 2, red hdc 3, white hdc 2, red hdc inc, hdc 1. Last repeat will end with red hdc inc.  (39)
7:  *Hdc, working white stitches into white stitch tops and red stitches into red st tops.  (39)
8:  In this round only, work color changes in the last yo of previous stitch. *Hdc, working white stitches into white stitch tops and red stitches into red st tops, to last stitch. End sc 1.  (39)
9:  With white, sl to join in back loop of first st. *White sl in back loops only.
Sl to join with first st. Tie off. Weave in ends. 

Detailed Instructions 

With white yarn, ch 31.
1:  Working into the bump on the back of each ch, join in a ring, ch 1 (does not count as first st), sc in same sp. Change to red. (Be sure to change colors between stitches.) *With red hdc 2, with white hdc 2.  Mark the end of this and each succeeding round. Do not join rounds. (31)
2:  White hdc 2. *Red hdc 2, white hdc 2. End red hdc 1.  (31)
3:  Red hdc 1, white hdc 2. *Red hdc 2, white hdc 2.  (31)
4:  *Red hdc inc, hdc 1, white hdc 2, red hdc 2, white hdc 2. Last repeat will end with only 1 white hdc instead of 2.  (35)
5:  White hdc 1, red hdc 3, white hdc 2, red hdc 2. *White hdc 2, red hdc 3, white hdc 2, red hdc 2.  (35)
6:  White hdc 2, red hdc 3, white hdc 2, red hdc inc, hdc 1. Last repeat will end with red hdc inc.  (39)
7:  Red hdc 1, white hdc 2. *Red hdc 3, white hdc 2. End red hdc 1.  (39)
8:  In this round only, work color changes in the last yo of previous stitch. Red hdc 2. *White hdc 2, red hdc 3. End white hdc 1, sc 1.  (39)
9:  With white, sl to join in back loop of first st. *White sl in back loops only.
Sl to join with first st. Tie off. Weave in ends.


Enjoy a nice cup of Christmas cheer!