Showing posts with label free holiday crochet pattern. Show all posts

Monday, March 14, 2016

Lucky Clover Earrings


To continue with my theme of wearable St. Patrick's Day crochet goodies, I have a very simple free pattern for you all. Lucky Clover Earrings. The design is based on my Lucky Clover Headband, and I made them with the same concept in mind—one with three leaves and one with four—because the fun of four-leaf clovers is searching for them! You could also make a matching pair with three leaves apiece for a shamrock look, or two with four leaves if you're feeling like you could use some extra luck.

I happen to have inherited a stash of crochet thread of indeterminate age, so I dipped into that for this pattern. I don't know if the color I used is still in production, but I'm sure there is plenty of green thread out there you can use. Even embroidery floss should work just fine, though the size of the finished earrings may be altered. My thread is a DMC Cotton Perle in a sage green, and the finished size came out to approximately .75" across the clovers and 1.25" from the stem to the top.


Lucky Clover Earrings

Materials

  • Size 5 crochet thread.
  • US 00, 3mm hook
  • Tapestry needle
  • Fabric stiffener (optional)
  • 2 flat-post earring backs
  • Hot glue

Abbreviations
            st : stitch
ch: chain
dc: double crochet
sl: slipstitch

Pattern

Make 2. I think it’s fun to have one 3-leaf and one 4-leaf clover, but you can certainly make a matching pair.  
 1: In a magic loop, ch 2, dc 2, ch 2, sl back into loop.  Repeat 2-3 more times, for a 3- or 4-leaf clover.
2: Ch 5, sl in second ch from hook, and each succeeding ch. Tie off. Pull magic loop tight and weave in ends. 
A Three Leaf Clover
And a Lucky Four Leaf Clover

Finishing

I recommend treating your clovers with fabric stiffener to help them keep their shape and not curl up at the edges. Once they’re dry and stiffened to your liking, use a glue gun to attach your flat-post earring back in the center of each clover. 


That’s it! You’re officially ready to celebrate St. Paddy’s.


Friday, March 4, 2016

Don't Get Pinched! Free Wearable Crochet Patterns for St. Paddy's Day

My preferred method of getting a little green in my wardrobe for St. Patrick's Day is, of course, something crocheted. To that end, I've put together a little collection of wearable crochet items to keep you in good luck on St. Paddy's. All of the following patterns are FREE and simple to make.

First up, I have to share my pattern for this Lucky Clover Headband, which I've had lots of fun wearing over the years. It features four clovers across the band, three with three leaves and just one that's a lucky four-leaf clover. The headband has a wide band with a tapered bottom for a more comfortable fit. Crochet kits including yarn and a printed pattern are available in my shop as well.


The Celtic Knot Bracelet by Jennifer E. Ryan is a super simple crochet pattern, just two long sc cords, woven together to create something magical. It looks like a lot of fun to wear!


These St. Patty’s Easy Crochet Boot Cuffs with Poms by Mama in a Stitch are a fun accessory for St. Paddy's or for any day, because you really can never have too many pom poms.

Classy Leprechaun Easy Crochet Boot Cuffs


For those who like to go all out with their St. Paddy's outfit, there's the St. Patrick's Day Chapeau by Sharon Mann, available from Red Heart. It's an easy pattern and uses Super Saver yarn, so it's very affordable too. 

Lw4063_inset_small2

Because the little ones in your life need some green as well, there are these St. Patrick's Day Shamrock Baby Booties by Hopeful Honey. These cute and simple little stash busters will work up in a jiffy.


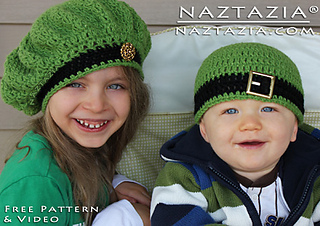
Another pair of patterns that are just as nice for everyday wear as to get your green on St. Paddy's are the Irish Inspired Beret and Beanie by Naztazia. These patterns even include a video tutorial.

Crochet-irish-inspired-beret-beanie-hat-st-patricks_small2

Have fun crocheting some Irish into your wardrobe!

Wednesday, December 23, 2015

Christmas Light Ornament


This is very likely my last blog post of year, so I'd like to go out with a bang, by which I mean a free pattern! It's a Christmas pattern, so yeah, very last minute, but it's so quick and easy you could whip one up on a short car ride to wherever you're spending your holiday. Almost any worsted weight yarn would work great and you need just a few yards to make your own Christmas Light Ornament. 

Christmas Light Ornament

Materials
  • Worsted weight yarn in at least two colors, Color A for the light portion and Color B for the top. My lights are made with Red Heart Super Saver in Ranch Red and Royal Blue, Red Heart Fiesta in Harvest, and Caron Simply Savor in Kelly Green. The tops are made with Caron Simply Soft in Autumn Maize.
  •  US G (4 mm) hook
  • Tapestry or Large eye blunt needle


Notes
  • Worked in a spiral; do not join rounds unless otherwise noted. Do not turn at ends of rounds.
  • Repeat directions following * to end of round.
Abbreviations
sc: single crochet
sl: slipstitch
inc: increase (crochet two stitches in one space)
BLO: back loops only

Gauge
Not crucial for this project

Instructions


With Color A, work 4 sc in magic ring
1: *sc inc, sc (6)
2: *sc (6)
3: *sc inc, sc (9)
4: *sc inc, sc 2 (12)
5: *sc
6: *sc inc, sc 2 (16)
7-8: *sc
9: *sc dec, sc 2 (12)
10: *sc dec, sc.  (8)
Sl to join. Tie off.
Stuff with poly fiberfill close to the top of the piece.
11: Join Color B in the back loop of any stitch of the last round. In BLO, *sc.
12-13: Sl to join in back loop of first st. In BLO, *sc.
Tie off, leaving a long tail to make a hanging loop for your ornament (6-8” should be enough).


Finishing
Pack stuffing up to the top of the ornament. Using a tapestry needle or large eye blunt needle, weave your yarn tail through the back loops of remaining stitches and pull tight to close. Weave back and forth a couple times to secure the yarn, ending in the center of the top of the light. Insert needle under a strand of yarn near where you’ve pulled up your yarn tail, pull it up until the loop looks about the right length for your ornament, and…tie a knot in it! I know, the horror. But don’t worry, just weave the yarn back under a few stitches to pull the knot underneath and out of sight and trim the tail, tucking the last bit of  yarn inside the ornament. 


I especially like little holiday projects like this as personal additions to gifts or cards, and they look nice on top of a prettily wrapped package. Adding a little something homemade makes a gift that much more special, even when you only had time for a mini-project like this one.


Or you can go ahead and hang it right on your tree! 


Happy Holidays!