Wednesday, December 23, 2015

Christmas Light Ornament


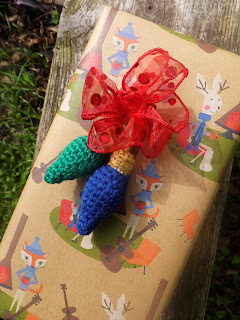
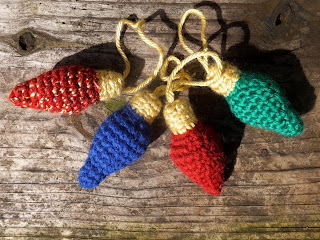
This is very likely my last blog post of year, so I'd like to go out with a bang, by which I mean a free pattern! It's a Christmas pattern, so yeah, very last minute, but it's so quick and easy you could whip one up on a short car ride to wherever you're spending your holiday. Almost any worsted weight yarn would work great and you need just a few yards to make your own Christmas Light Ornament

Christmas Light Ornament

Materials
  • Worsted weight yarn in at least two colors, Color A for the light portion and Color B for the top. My lights are made with Red Heart Super Saver in Ranch Red and Royal Blue, Red Heart Fiesta in Harvest, and Caron Simply Savor in Kelly Green. The tops are made with Caron Simply Soft in Autumn Maize.
  •  US G (4 mm) hook
  • Tapestry or Large eye blunt needle


Notes
  • Worked in a spiral; do not join rounds unless otherwise noted. Do not turn at ends of rounds.
  • Repeat directions following * to end of round.
Abbreviations
sc: single crochet
sl: slipstitch
inc: increase (crochet two stitches in one space)
BLO: back loops only

Gauge
Not crucial for this project

Instructions


With Color A, work 4 sc in magic ring
1: *sc inc, sc (6)
2: *sc (6)
3: *sc inc, sc (9)
4: *sc inc, sc 2 (12)
5: *sc
6: *sc inc, sc 2 (16)
7-8: *sc
9: *sc dec, sc 2 (12)
10: *sc dec, sc.  (8)
Sl to join. Tie off.
Stuff with poly fiberfill close to the top of the piece.
11: Join Color B in the back loop of any stitch of the last round. In BLO, *sc.
12-13: Sl to join in back loop of first st. In BLO, *sc.
Tie off, leaving a long tail to make a hanging loop for your ornament (6-8” should be enough).


Finishing
Pack stuffing up to the top of the ornament. Using a tapestry needle or large eye blunt needle, weave your yarn tail through the back loops of remaining stitches and pull tight to close. Weave back and forth a couple times to secure the yarn, ending in the center of the top of the light. Insert needle under a strand of yarn near where you’ve pulled up your yarn tail, pull it up until the loop looks about the right length for your ornament, and…tie a knot in it! I know, the horror. But don’t worry, just weave the yarn back under a few stitches to pull the knot underneath and out of sight and trim the tail, tucking the last bit of  yarn inside the ornament. 


I especially like little holiday projects like this as personal additions to gifts or cards, and they look nice on top of a prettily wrapped package. Adding a little something homemade makes a gift that much more special, even when you only had time for a mini-project like this one.


Or you can go ahead and hang it right on your tree! 


Happy Holidays!


Wednesday, December 16, 2015

Candy Cane Coffee Cozy

If you're anything like me, the holidays always somehow come sooner than you expect, and you don't consider a gift "last minute" unless you're weaving in the ends in the car on the way to Grandma's. If you're like me and you're in the market for a quick stash-busting stocking stuffer, I have the free pattern for you!


 My Candy Cane Coffee Cozy uses just half an ounce of yarn total and works up super quick. It's a very simple pattern with just one unusual technique, a technique I'd say is actually easier than the usual method. If you've done crochet colorwork before, you likely know that color changes are smoother when done in the last yarnover of the stitch before the color change.

However, since this pattern is designed to spiral like the stripes on a candy cane, the color changes work best when made BETWEEN the stitches instead. For this method, you'd work a complete hdc with color A, then change to color B for the first yarnover of the next stitch. The result will look like this:


See how the last red stitch top appears over a white stitch, and the last white stitch top appears over a red stitch? This method works for this pattern because of the color changes shift one stitch to the left on each round. After round one, you'll work red stitches only into stitches with red tops and white stitches into stitches with white tops. Pretty nifty, eh?

For the last round of hdcs (Round 8), color changes are worked in the traditional method. In the last stitch before a color change, you'll use color A to yo, insert your hook into the stitch, yo and pull up a loop, then color B to yo the last time and pull through all the loops on the hook. The result looks like this:


Red tops on red stitches and white tops on white ones. This method is used for the final round of hdcs to give the piece a more finished look.

I wrote this pattern up in both a simple version and a detailed version. I find the simple version easier to follow, but if you'd rather see exactly how many stitches of each color and in what order they're worked, check out the detailed version. Both are free and both are below. A downloadable pdf is also available in my Ravelry Store. Enjoy!

Candy Cane
Coffee Cozy


Materials

  • Worsted weight yarn in red and white. Shown in Red Heart Super Saver in Ranch Red and White.
  • US H (5 mm) hook, or size needed to obtain gauge
  • Tapestry or Large eye blunt needle

Notes

  • Worked in a spiral; do not join rounds unless otherwise noted. Do not turn at ends of rounds.
  • Repeat directions following * to end of round, unless otherwise noted.
  •  Change colors between stitches rather than in the last yarn over of previous stitch, except in last round of hdcs. See this blog post for explanation:
  • Color designations are given before the stitches they apply to. “White hdc 2” means to work the next two hdc in white.

 Abbreviations

ch: chain
sc: single crochet
hdc: half-double crochet
sl: slipstitch
inc: increase (crochet two stitches in one space)

Gauge
8 sts and 5.5 rows = 2 inches in hdc 

Simplified Instructions 

With white yarn, ch 31.
1:  Working into the bump on the back of each ch, join in a ring, ch 1 (does not count as first st), sc in same sp. Change to red. (Be sure to change colors between stitches.) *With red hdc 2, with white hdc 2.  Mark the end of this and each succeeding round. Do not join rounds. (31)
2-3:  *Hdc, working white stitches into white stitch tops and red stitches into red st tops.  (31)
4:  *Red hdc inc, hdc 1, white hdc 2, red hdc 2, white hdc 2. Last repeat will end with only 1 white hdc instead of 2.  (35)
5:  *Hdc, working white stitches into white stitch tops and red stitches into red st tops.  (35)
6:  White hdc 2, red hdc 3, white hdc 2, red hdc inc, hdc 1. Last repeat will end with red hdc inc.  (39)
7:  *Hdc, working white stitches into white stitch tops and red stitches into red st tops.  (39)
8:  In this round only, work color changes in the last yo of previous stitch. *Hdc, working white stitches into white stitch tops and red stitches into red st tops, to last stitch. End sc 1.  (39)
9:  With white, sl to join in back loop of first st. *White sl in back loops only.
Sl to join with first st. Tie off. Weave in ends. 

Detailed Instructions 

With white yarn, ch 31.
1:  Working into the bump on the back of each ch, join in a ring, ch 1 (does not count as first st), sc in same sp. Change to red. (Be sure to change colors between stitches.) *With red hdc 2, with white hdc 2.  Mark the end of this and each succeeding round. Do not join rounds. (31)
2:  White hdc 2. *Red hdc 2, white hdc 2. End red hdc 1.  (31)
3:  Red hdc 1, white hdc 2. *Red hdc 2, white hdc 2.  (31)
4:  *Red hdc inc, hdc 1, white hdc 2, red hdc 2, white hdc 2. Last repeat will end with only 1 white hdc instead of 2.  (35)
5:  White hdc 1, red hdc 3, white hdc 2, red hdc 2. *White hdc 2, red hdc 3, white hdc 2, red hdc 2.  (35)
6:  White hdc 2, red hdc 3, white hdc 2, red hdc inc, hdc 1. Last repeat will end with red hdc inc.  (39)
7:  Red hdc 1, white hdc 2. *Red hdc 3, white hdc 2. End red hdc 1.  (39)
8:  In this round only, work color changes in the last yo of previous stitch. Red hdc 2. *White hdc 2, red hdc 3. End white hdc 1, sc 1.  (39)
9:  With white, sl to join in back loop of first st. *White sl in back loops only.
Sl to join with first st. Tie off. Weave in ends.


Enjoy a nice cup of Christmas cheer!


Thursday, November 5, 2015

The Unluckiest Halloween Ever

All that's left of Halloween now is the candy, and of course the pictures. This year I did something I don't normally do, a big involved project straight out of horror movie history. I designed and hand knitted Pamela Voorhees' sweater from Friday the 13th. The protective, murderous mother who started Jason's numerous killing sprees around Camp Crystal Lake.

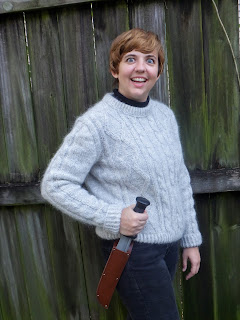
Here I am with my doppelganger Betsy Palmer.


If it weren't for my inability to make a scary face, you could hardly tell us apart!

I became interested in this design when Google revealed that no one else (I could find) seems to have made one. I found my calling! Then I only had to buy a comparable yarn, figure out all the cables, determine a gauge that would space them correctly, and design the sweater shape and fit. No problem, right?

Did I mention this was my first time designing a sweater?
Yep.  I do like to make things as complicated for myself as possible.

To match Mrs. Voorhees' classic silhouette, I went for a loose and boxy design, with about 3" of ease around the bust and 2" around the arms.

A loose fit keeps you mobile for murderousness

The yarn is Lettlopi, an Icelandic wool I picked up from Craftsy, in the colorway Ash Heather. It's a slightly fuzzy wool, variegated in white and gray. The recommended needle size is 8, but I found that too loose, and used size 6 instead.


One particular struggle I had was the the rather flat looking cables in the center panel. It took a few experiments before I discovered the wonder of uneven cables. Though I've made more than a couple projects with cables, I'd always used the "even" methodcrossing 2, or 3, or 4 stitches across the same number of stitches. For this project I tried a variety of number of stitches and rows, but whatever I tried, it didn't look quite like the original. They stood out too much and didn't have the softness I was looking for. A little research revealed that uneven cables can achieve the look I was searching for. The very simple solution was crossing 3 stitches over 2! 

I used another new-to-me method on the cuffs. They appeared to be folded over in the original, so I made the cuff twice the length I usually would, then folded it up and stitched it into place. 

This required that I seam it so the right side of the cuff was opposite to the right side of the sleeve body. 
The seam is on the outside of the cuff.

It become invisible once the cuff is folded up.
The collar was made using the same method, giving it a thickness that keeps it very stable.

I had a lot of fun with this project and looking forward to wearing my very unlucky Friday the 13th sweater all winter long.  I hope to have the full pattern up for sale in time for next Halloween!


Ready for anything.