Wednesday, December 16, 2015

Candy Cane Coffee Cozy

If you're anything like me, the holidays always somehow come sooner than you expect, and you don't consider a gift "last minute" unless you're weaving in the ends in the car on the way to Grandma's. If you're like me and you're in the market for a quick stash-busting stocking stuffer, I have the free pattern for you!


 My Candy Cane Coffee Cozy uses just half an ounce of yarn total and works up super quick. It's a very simple pattern with just one unusual technique, a technique I'd say is actually easier than the usual method. If you've done crochet colorwork before, you likely know that color changes are smoother when done in the last yarnover of the stitch before the color change.

However, since this pattern is designed to spiral like the stripes on a candy cane, the color changes work best when made BETWEEN the stitches instead. For this method, you'd work a complete hdc with color A, then change to color B for the first yarnover of the next stitch. The result will look like this:


See how the last red stitch top appears over a white stitch, and the last white stitch top appears over a red stitch? This method works for this pattern because of the color changes shift one stitch to the left on each round. After round one, you'll work red stitches only into stitches with red tops and white stitches into stitches with white tops. Pretty nifty, eh?

For the last round of hdcs (Round 8), color changes are worked in the traditional method. In the last stitch before a color change, you'll use color A to yo, insert your hook into the stitch, yo and pull up a loop, then color B to yo the last time and pull through all the loops on the hook. The result looks like this:


Red tops on red stitches and white tops on white ones. This method is used for the final round of hdcs to give the piece a more finished look.

I wrote this pattern up in both a simple version and a detailed version. I find the simple version easier to follow, but if you'd rather see exactly how many stitches of each color and in what order they're worked, check out the detailed version. Both are free and both are below. A downloadable pdf is also available in my Ravelry Store. Enjoy!

Candy Cane
Coffee Cozy


Materials

  • Worsted weight yarn in red and white. Shown in Red Heart Super Saver in Ranch Red and White.
  • US H (5 mm) hook, or size needed to obtain gauge
  • Tapestry or Large eye blunt needle

Notes

  • Worked in a spiral; do not join rounds unless otherwise noted. Do not turn at ends of rounds.
  • Repeat directions following * to end of round, unless otherwise noted.
  •  Change colors between stitches rather than in the last yarn over of previous stitch, except in last round of hdcs. See this blog post for explanation:
  • Color designations are given before the stitches they apply to. “White hdc 2” means to work the next two hdc in white.

 Abbreviations

ch: chain
sc: single crochet
hdc: half-double crochet
sl: slipstitch
inc: increase (crochet two stitches in one space)

Gauge
8 sts and 5.5 rows = 2 inches in hdc 

Simplified Instructions 

With white yarn, ch 31.
1:  Working into the bump on the back of each ch, join in a ring, ch 1 (does not count as first st), sc in same sp. Change to red. (Be sure to change colors between stitches.) *With red hdc 2, with white hdc 2.  Mark the end of this and each succeeding round. Do not join rounds. (31)
2-3:  *Hdc, working white stitches into white stitch tops and red stitches into red st tops.  (31)
4:  *Red hdc inc, hdc 1, white hdc 2, red hdc 2, white hdc 2. Last repeat will end with only 1 white hdc instead of 2.  (35)
5:  *Hdc, working white stitches into white stitch tops and red stitches into red st tops.  (35)
6:  White hdc 2, red hdc 3, white hdc 2, red hdc inc, hdc 1. Last repeat will end with red hdc inc.  (39)
7:  *Hdc, working white stitches into white stitch tops and red stitches into red st tops.  (39)
8:  In this round only, work color changes in the last yo of previous stitch. *Hdc, working white stitches into white stitch tops and red stitches into red st tops, to last stitch. End sc 1.  (39)
9:  With white, sl to join in back loop of first st. *White sl in back loops only.
Sl to join with first st. Tie off. Weave in ends. 

Detailed Instructions 

With white yarn, ch 31.
1:  Working into the bump on the back of each ch, join in a ring, ch 1 (does not count as first st), sc in same sp. Change to red. (Be sure to change colors between stitches.) *With red hdc 2, with white hdc 2.  Mark the end of this and each succeeding round. Do not join rounds. (31)
2:  White hdc 2. *Red hdc 2, white hdc 2. End red hdc 1.  (31)
3:  Red hdc 1, white hdc 2. *Red hdc 2, white hdc 2.  (31)
4:  *Red hdc inc, hdc 1, white hdc 2, red hdc 2, white hdc 2. Last repeat will end with only 1 white hdc instead of 2.  (35)
5:  White hdc 1, red hdc 3, white hdc 2, red hdc 2. *White hdc 2, red hdc 3, white hdc 2, red hdc 2.  (35)
6:  White hdc 2, red hdc 3, white hdc 2, red hdc inc, hdc 1. Last repeat will end with red hdc inc.  (39)
7:  Red hdc 1, white hdc 2. *Red hdc 3, white hdc 2. End red hdc 1.  (39)
8:  In this round only, work color changes in the last yo of previous stitch. Red hdc 2. *White hdc 2, red hdc 3. End white hdc 1, sc 1.  (39)
9:  With white, sl to join in back loop of first st. *White sl in back loops only.
Sl to join with first st. Tie off. Weave in ends.


Enjoy a nice cup of Christmas cheer!


Thursday, November 5, 2015

The Unluckiest Halloween Ever

All that's left of Halloween now is the candy, and of course the pictures. This year I did something I don't normally do, a big involved project straight out of horror movie history. I designed and hand knitted Pamela Voorhees' sweater from Friday the 13th. The protective, murderous mother who started Jason's numerous killing sprees around Camp Crystal Lake.

Here I am with my doppelganger Betsy Palmer.


If it weren't for my inability to make a scary face, you could hardly tell us apart!

I became interested in this design when Google revealed that no one else (I could find) seems to have made one. I found my calling! Then I only had to buy a comparable yarn, figure out all the cables, determine a gauge that would space them correctly, and design the sweater shape and fit. No problem, right?

Did I mention this was my first time designing a sweater?
Yep.  I do like to make things as complicated for myself as possible.

To match Mrs. Voorhees' classic silhouette, I went for a loose and boxy design, with about 3" of ease around the bust and 2" around the arms.

A loose fit keeps you mobile for murderousness

The yarn is Lettlopi, an Icelandic wool I picked up from Craftsy, in the colorway Ash Heather. It's a slightly fuzzy wool, variegated in white and gray. The recommended needle size is 8, but I found that too loose, and used size 6 instead.


One particular struggle I had was the the rather flat looking cables in the center panel. It took a few experiments before I discovered the wonder of uneven cables. Though I've made more than a couple projects with cables, I'd always used the "even" methodcrossing 2, or 3, or 4 stitches across the same number of stitches. For this project I tried a variety of number of stitches and rows, but whatever I tried, it didn't look quite like the original. They stood out too much and didn't have the softness I was looking for. A little research revealed that uneven cables can achieve the look I was searching for. The very simple solution was crossing 3 stitches over 2! 

I used another new-to-me method on the cuffs. They appeared to be folded over in the original, so I made the cuff twice the length I usually would, then folded it up and stitched it into place. 

This required that I seam it so the right side of the cuff was opposite to the right side of the sleeve body. 
The seam is on the outside of the cuff.

It become invisible once the cuff is folded up.
The collar was made using the same method, giving it a thickness that keeps it very stable.

I had a lot of fun with this project and looking forward to wearing my very unlucky Friday the 13th sweater all winter long.  I hope to have the full pattern up for sale in time for next Halloween!


Ready for anything.


Thursday, October 29, 2015

Halloween! What are you making?


Boo! It's only two days until Strung Out Fiber Arts' favorite holiday. Though my shop is always busy in the months before Halloween, the number of orders that came in this year caught me off guard. I have been busy busy making many little Snow Whites, many little Cinderellas, and many, many, many little Elvises. Now that Halloween is right around the corner, I have a bit more time for my own projects.
 
If (like me) you're still in the Halloween mood and (unlike me) have finished your Halloween costume,  check out this great list of free patterns for Halloween Decorations compiled by Moogly.

crochet patterns free halloween decoration ideas crochet halloween decorations ideas fun seasonal


I particularly enjoy the Spider in a Jar on Fun and Fang and the Zombie Phone Case on Cult of Crochet, which, let's be honest, I would rock all year round. All these last minute goodies look like tons of fun, but what I really want to tell you about is the super-secret project I'll be showing off on Halloween night.

It's quite a bit different from my usual Halloween projects, which run more along the line of these extremely classy wigs (warning: shameless plug for a pattern available in my Ravelry Store).

The Mod Bob with Devil Horns
The Mod Bob with Alien Antennae


My project this year isn't a hat at all. There are no horns or antennas involved. No blood shot eyeballs. No vampire teeth.
 
In fact, it's a sweater.

Scary right? If you're too afraid, you can stop reading here. I won't judge.

It is in fact a very specific sweater from a particular classic horror movie, and I am very much looking forward to sharing my terrifying new look with you all (just as soon as I get the darn thing finished). Any guesses?

No, it's not this one.

http://v.popapostle.com/images/episodes/V80/Together-We-Stand/Freddy-Krueger.jpg

Too Easy!

I can't tell you just yet, since it's still in it's final stages of seaming and finishing, but I will tell you it involves cables. A terrifying number of cables! Haunted cables.


Do you recognize it?

Tune in for the exciting conclusion...coming soon.


Thursday, August 13, 2015

Rainbows and Adult Beverages

Summer: it's all about rainbows and beer, amiright? Here in sticky, swampy New Orleans, I admit I haven't been keeping up with my backlog of projects as well I do in the cool(er) months, but summer is the perfect time for those quick, stash-busting projects that can keep your fingers busy without heating you up. No afghans, please.

This project is fun for a lot of reasons. It has rainbows, it has googly eyes, it begs you to crack open a cold one, and best of all you can use it right away no matter what the weather is outside because you won't be wearing ityour beverage will!


Behold the rare and elusive Rainbeer
.


I made this for a good friend's birthday and it looks like the celebration it is. A birthday celebration and a celebration of marriage equality, not to mention a celebration of the brief cool respite that follows summer rainstorms.

You may notice this koozie is more expressive than most.  The eyes are by no means necessary. I mean, a traditional rainbow is still pretty fun. But I have to say I was surprised by how much they add to the piece. Even without any other facial feature, this koozie has some serious personality. 

Rainbeer

Materials
  • Worsted weight yarn in the colors of the Rainbow, plus black and white for eyes if desired. Shown in Red Heart Super Saver in Ranch Red, Carrot, Gold, Hunter Green, Royal, Dark Orchid, Black, and White.
  • US H (5 mm) hook, or size needed to obtain gauge
  • Tapestry or Large eye blunt
  • Sewing pins

 Notes
  • Turning chains do not count as the first stitch of rows.
  • Repeat directions following * to end of round.

Abbreviations
ch: chain
sc: single crochet
hdc: half-double crochet
sl: slipstitch
inc: increase (crochet two stitches in one space)
BLO: back loop only

Gauge
14 sts and 11 rows = 4 inches in hdc

Instructions

With Dark Orchid, make a magic ring.

1:  Ch 1, hdc 8. Sl to join this and all succeeding rounds. Do not turn.  (8)
2:  Ch 1, *hdc inc.  (16)
3:  Ch 1, *hdc, hdc inc.  (24)
4:  Ch 1, *hdc 5, hdc inc.  (28)
5-6:  Ch 1, *hdc.
7:  With Royal, join round in back loop only (BLO). Ch 1, *hdc in BLO.
8:  Ch 1, *hdc.
9:  With Hunter Green, join round in BLO. Ch 1, *hdc in BLO.
10:  Ch 1, *hdc.
11:  With Gold, join round in BLO. Ch 1, *hdc in BLO.
12:  Ch 1, *hdc.
13:  With Carrot, join round in BLO. Ch 1, *hdc in BLO.
14:  Ch 1, *hdc.
15:  With Ranch Red, join round in BLO. Ch 1, *hdc in BLO.
16:  Ch 1, *hdc.
17:  Join in BLO. *Sl loosely in BLO. Join round. Tie off. Weave in all ends. 

Your koozie should now look like this:


 Stop here, or give your koozie some personality and add the googly eyes!

Eyes (optional)
Make 2

Pupil
With black, make a magic ring.
Ch 1, sc 4. Sl to join. Tie off leaving long tail to sew edge down to eye white.
White
With white, make a magic ring.
Ch 1, hdc 8. Sl to join. Tie off, leaving long tail to sew eye to koozie.
  
Finishing
Position pupil on white however looks best to you and pin in place. This is totally personal preference. You can have the pupils centered at the bottom of the white if you like the way mine looks, but you can also have your Rainbeer looking up, looking to the side, cross-eyed, or with both eyes in different directions. Give it some personality! Using a large eye blunt needle, stitch around edge of pupil. Weave in ends.

Next, position the finished eyes on the koozie and pin in place. I thought mine looked best with the bottom of the eyes lined up with the bottom of the gold band, but again, totally up to you! Have fun with it. Using a large eye blunt needle, stitch around edge of white. Weave in ends.

You’re done!  Give your Rainbeer a drink!

 My Rainbeer has a Sierra Nevado Torpedo. I think he likes it.

This design is available as a pdf download from my Ravelry shop: Strung Out Fiber Arts Designs


Sunday, June 14, 2015

Quick Projects for Father's Day

If you're anything like me, about a week out is when you start really thinking (panicking?) about getting together a handmade gift.

Thankfully, there are lots and lots of free or inexpensive patterns you can whip up quickly and easily and that will be sure to make your dad proud.

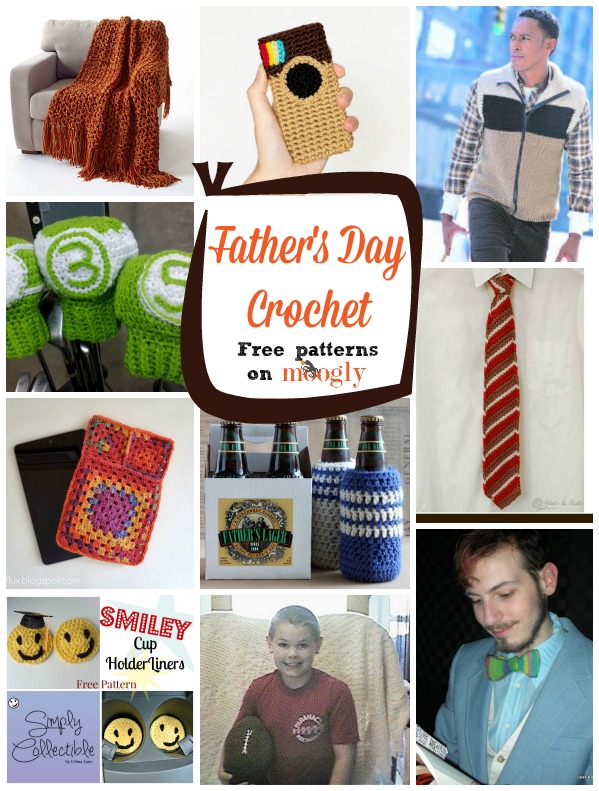
Moogly has several lists of free patterns for Dad-day you can find on the blog. I'm partial to this one from last year: Father's Day Crochet 2014. That snazzy vest! The too-darn-cute instagram-inspired phone cover! TWO kinds of neck tie! And other than the vest and the throw, they should all work up fairly quickly.


Free #Crochet Patterns for Father's Day! Get links to them all at Mooglyblog.com


If your dad's a golfing kinda guy, take a look at this year's list, which includes 3 different patterns for golfers: Father's Day Crochet 2015


Free Crochet Patterns for Father's Day, 10 Ideas, 15 Free Patterns, beer, apron, dopp, tie, hat, golf, socks, remote control, running dads, moogly


Lion Brand offers a classic looking set of Golf Club Covers. I like how the simple color changes make them look different, but they're clearly still a matching set. And those numbers are both nice looking and useful!

Image of Golf Club Covers


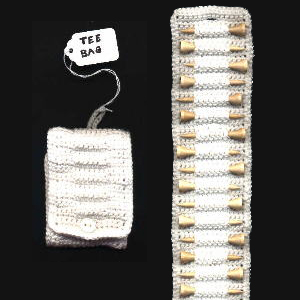
If your dad is a bit too goofy for that, try this Tee Bag pattern by Priscilla Hewitt. It's adorable, unique, and comes with its own pun!

Free Crochet Pattern Father's Day Golf Tee Organizer Bag


 And for the Caddyshack fanatic, Red Heart has a pattern for Gopher Golf Club Covers. Too funny!
   
Gopher Golf Club Cover

For the tech lover, try this simple, Stash Buster Tablet Case from Habitual Homebody. While great as a stash buster, you could also alter the colors to match your dad's favorite sports team. I'm sure the sizing would be fairly simple to adjust as well.

Stash buster crochet tablet case


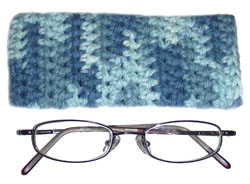
For a super duper easy gift, try the Absolutely Easy Glasses Case by Rachel Choi. Choosing a variegated yarn will give this simple pattern some interest, but it would look good in any color, and it's one of the more practical gifts you could give.

crochet glasses case

 Aaand, for the shameless self-promotion portion of this episode, my very own Power Tie Coffee Cozy pattern can be found in the May issue of Happily Hooked Magazine. (There are many other patterns in there too, of course.)


I may be biased, but I think it's pretty cute. You can try the magazine out for just 99 cents, but subscribers do get some special perks like a free coupons for patterns by designers included in the issue, including my very own Mod Bob.  


That one might not be suitable for dad...unless you're dad is SUPER fun. Then go for it!